
My forsythia looked like it was having a rough decade. Leggy, crossed branches everywhere, a couple of dead canes mixed in with the live ones. I went at it one spring with a pair of cheap anvil-style shears I'd had for years, hacking away and feeling pretty good about myself. Two weeks later, the cut ends had turned brown, a few stems were rotting back past where I'd cut, and the whole thing looked worse than before I started. The plant did recover, eventually. But it took most of the season, and I lost the flowers entirely that year.
Turns out I had been using the wrong tool and the wrong technique for years. Once I switched to a proper bypass pruner and learned a handful of simple rules, my shrubs started healing inside a week and putting out new growth right where I wanted it. If your cuts are leaving torn, ragged ends or your shrubs seem to sulk after a trim, this guide is for you. We will walk through the whole process from picking up the right tool to making the final cut, using the VIVOSUN 6.5 inch bypass pruning shear as the example throughout. Over 64,000 Amazon buyers use this shear for exactly this kind of everyday shrub work, and for good reason.
If your current shears are crushing instead of cutting, a sharp bypass pruner fixes that immediately.
The VIVOSUN 6.5" bypass pruner has 64,571 Amazon reviews at 4.6 stars. It is sharp out of the box, comfortable to hold for extended sessions, and priced low enough that replacing it after a season of hard use is not a big deal. Check the current price before you start pruning season.
Amazon Check Today's Price on Amazon →Step 1: Gather What You Actually Need (It Is a Short List)
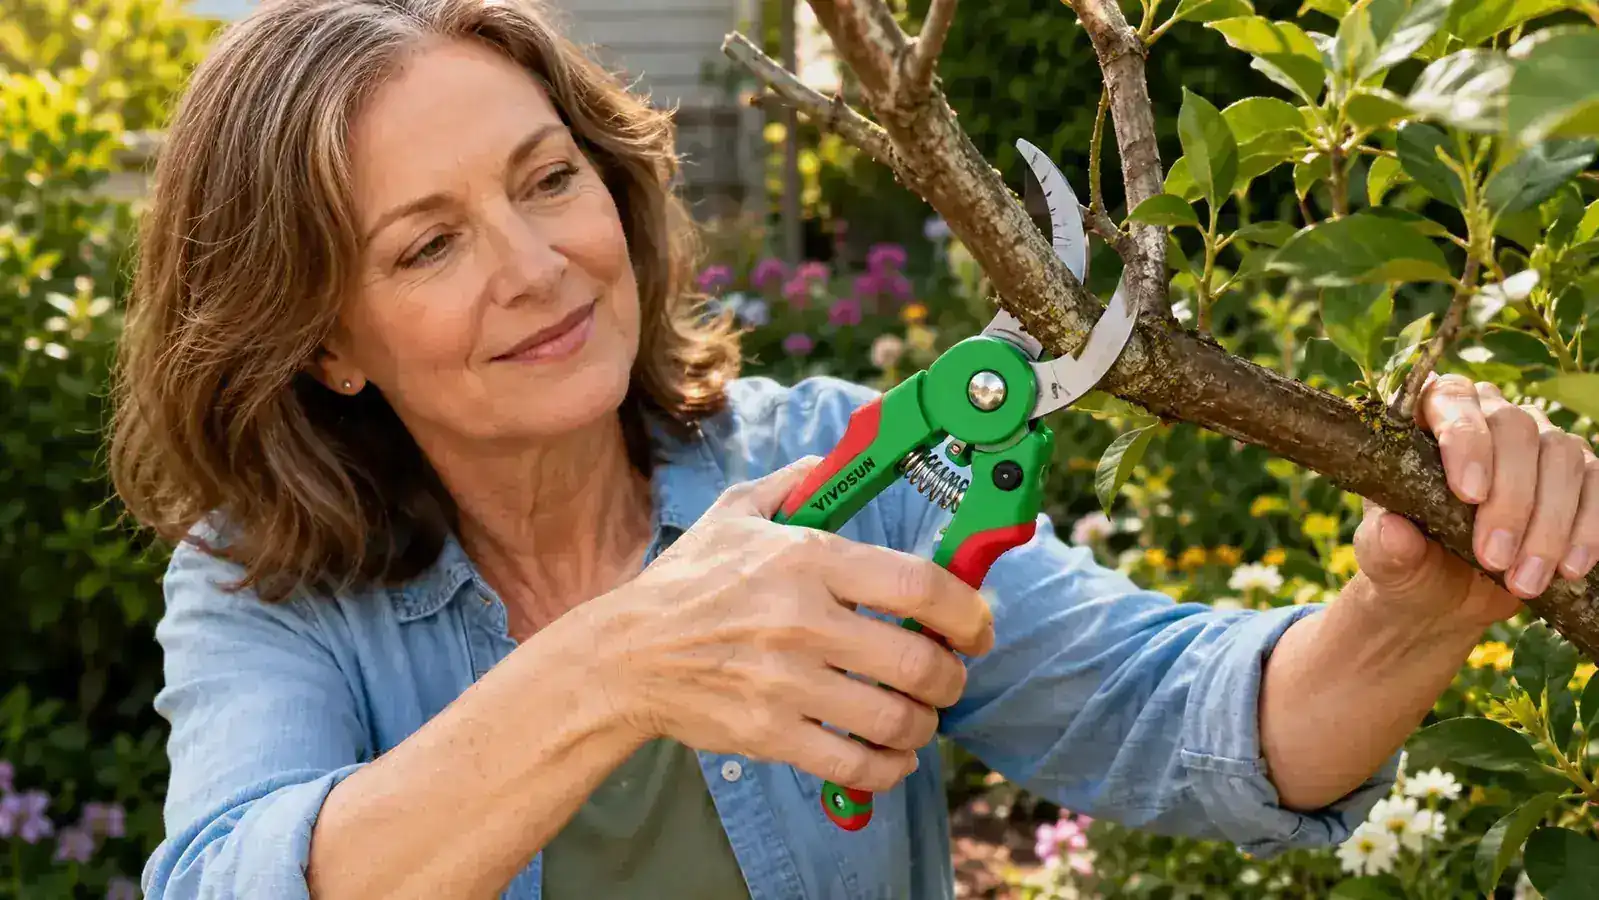
You do not need a shed full of gear to prune shrubs well. For most home shrubs up to about half an inch in stem diameter, a quality bypass hand pruner is all you need. Bypass pruners work like scissors: one sharp blade passes by a thicker counter-blade, slicing cleanly through the stem. Compare that to anvil pruners, where the blade drives straight down onto a flat plate. Anvil tools crush as much as they cut, which leaves tissue damage that is slow to heal and invites disease. If you have been using a cheap anvil pruner and wondering why your plants look rough after a trim, that is likely your answer.
Beyond the pruner, grab a pair of gardening gloves (rose canes in particular will remind you why), a small bucket or tarp to catch clippings, and a bottle of rubbing alcohol or a bleach-water solution at about 10 percent concentration. That last one is for wiping blades between plants, especially if anything in the garden has shown signs of disease. You do not need pruning paint or wound sealant; research has shown it actually slows healing in most species. Clean cuts and clean blades are what matter. Everything else is clutter.
If you have got stems thicker than three-quarters of an inch, you will want loppers for those. But the VIVOSUN bypass shear handles a full season of general shrub maintenance on roses, spirea, forsythia, barberry, and most ornamental shrubs without any trouble. It stays sharp longer than you would expect for the price, and the spring-loaded return mechanism opens the blades back up after each cut so your hand does not have to do all the work. On a long pruning session, that small detail matters more than you might think.
Step 2: Pick the Right Time to Prune Each Shrub Type
Timing is the thing most beginner guides skim over, and it is where a lot of gardeners get themselves into trouble. The short version: spring-blooming shrubs (forsythia, lilac, azalea, weigela) set their flower buds on last year's wood. If you prune them in fall or early spring before they bloom, you cut off all the flowers. Prune them right after they finish blooming in spring, and you get a clean plant with the rest of the growing season to develop next year's buds. I used to prune everything in late March and then wonder why my lilac never flowered. Mystery solved.
Summer-blooming shrubs (butterfly bush, rose of Sharon, spirea in some varieties) bloom on new growth from the current season, so you can prune those in late winter or early spring without losing any flowers. Roses are their own category: most gardeners do a hard prune in early spring once the forsythia starts to bloom, then deadhead throughout the season to keep new flowers coming. If you are not sure what type you have, look it up once and write it on a garden stake. Your future self will thank you. And honestly, it is a five-minute internet search that will save you years of confusion.
Step 3: Assess the Shrub Before You Make a Single Cut
Walk around the shrub and just look at it for a minute before you start cutting. You are looking for three things: dead, diseased, or damaged wood (called the three Ds), crossing branches that rub against each other, and any canes that are growing inward toward the center of the plant instead of outward. All three of those categories come out first, regardless of timing rules. This mental triage step takes about two minutes and saves you from making cuts in the wrong order.
Dead wood is usually obvious: it is dry, brittle, and does not have any green under the bark if you scratch it lightly with a fingernail. Diseased wood often has discolored or sunken areas. Crossing branches create wounds where they rub, and those wounds become entry points for fungus and insects. Inward-growing canes crowd the center and reduce airflow, which leads to mildew problems in humid climates. Once you have spotted all of these, your mental map of what to remove is usually pretty clear. In a well-established shrub you might be surprised how many dead or crossing canes are hiding in the interior once you start looking.
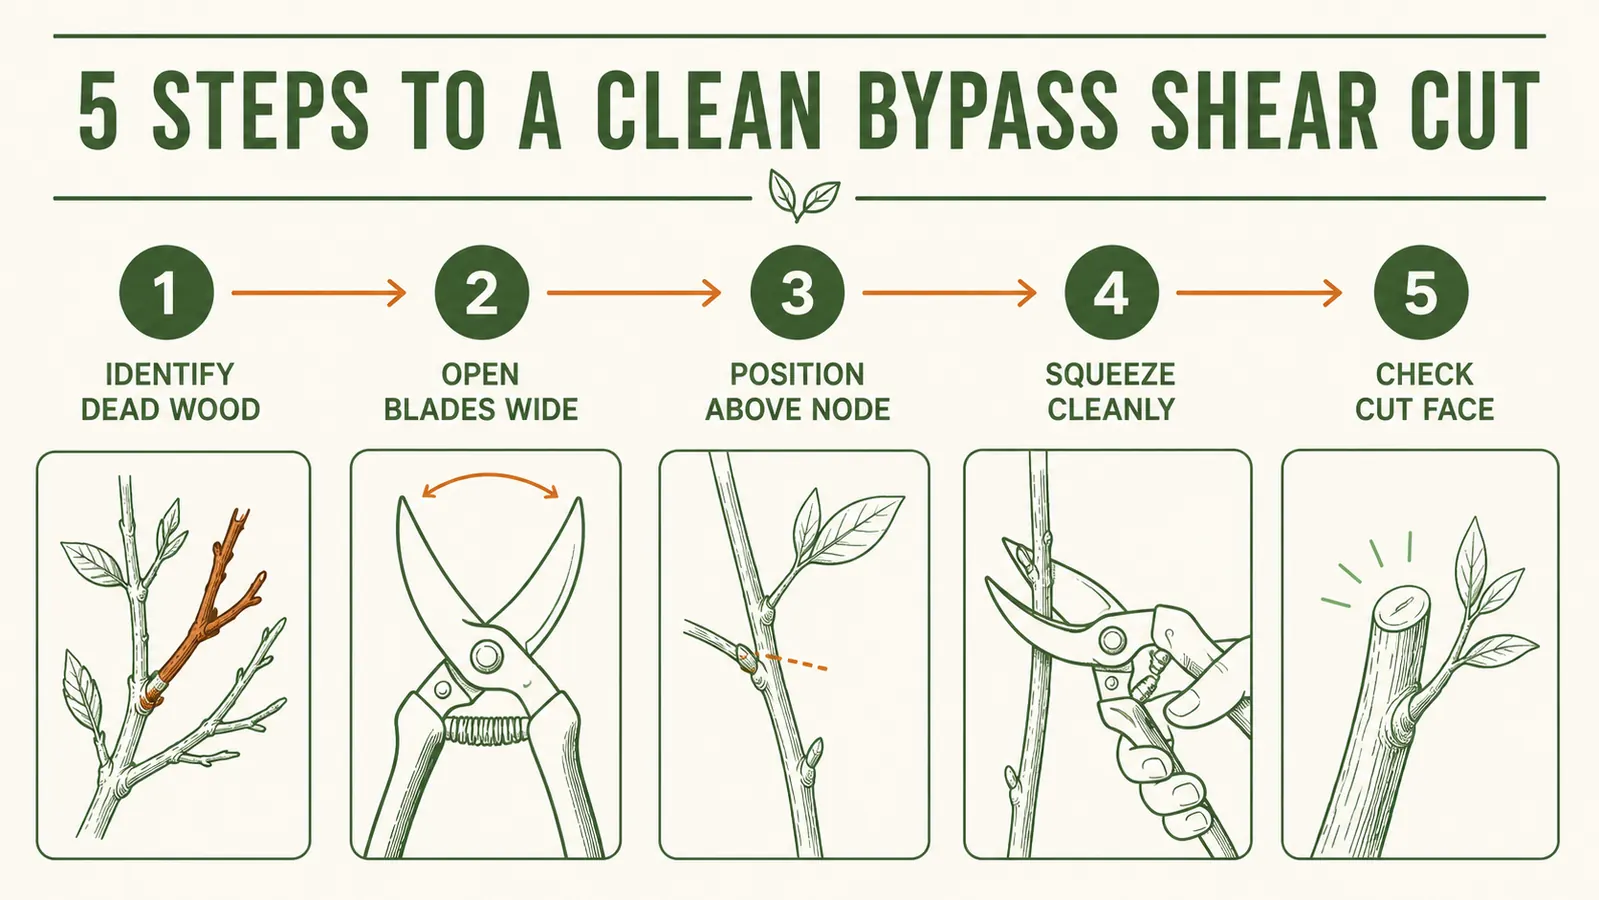
Step 4: Make the Cut at the Right Spot and the Right Angle
This is where most people get it wrong, even when they have the right tool. The two rules are simple: cut just above a leaf node or a lateral branch, and cut at a 45-degree angle slanting away from the bud. The angle matters because it sheds water away from the cut surface, which reduces the chance of rot sitting on top of the wound. Cutting flat or toward the bud traps moisture right where you do not want it. If you can only remember one thing from this whole article, make it the angle.
How close to the node? About a quarter inch above it. Any closer and you risk damaging the bud itself. Any farther and you leave a stub of dead tissue that the plant has to wall off, which takes energy and can become a disease harbor. Quarter inch is your target. With a sharp bypass pruner, you can feel the difference between a blade that is slicing cleanly and one that is having to push through. If it feels like you are muscling it, stop and check whether your blade needs a quick touch with a sharpening stone before you continue.
On older multi-stem shrubs like forsythia or lilac, you can do what is called renewal pruning: remove the oldest, thickest canes all the way down to the ground. This is not scary once you do it the first time. Cutting a cane flush at the base encourages the plant to push new growth from the root crown, and that new growth is usually more vigorous and better-shaped than the old woody stems. Take no more than a third of the canes in any one season. The plant needs what remains to keep feeding itself while it recovers.
A clean 45-degree cut a quarter inch above the node is about as close to a guarantee as gardening gets. Nail those two details and the plant does the rest.
Step 5: Clean Up and Wipe Down Your Blades Between Plants
Do not skip the sanitation step. If you move your pruner from a plant that looks even slightly stressed, off-color, or spotted to a healthy one without wiping the blades, you can spread fungal spores and bacterial infections between plants. A quick wipe with a rag soaked in 70 percent rubbing alcohol takes about 10 seconds per plant. If you are using a bleach solution, keep it diluted (about a tablespoon of bleach per cup of water) because a stronger mix can corrode the blade over time. This is one of those things that seems overly cautious until the year you watch fire blight jump from your pear tree to your rose bed and take out half the canes.
After each pruning session, wipe your blades dry, put a tiny drop of 3-in-1 oil or any light machine oil on the pivot point and the blade, and open and close the pruner a few times to work it in. The VIVOSUN shear has a safety lock on the handle that clicks into place when you close it, so you can store it without worrying about the blade popping open on your hand when you reach into the tool bucket. Small thing, but you appreciate it after you've been stabbed by an unlocked pruner once. Also, store it somewhere dry. Moisture sitting on steel, even stainless, will eventually cause pitting if you leave it long enough.
What Else Helps: Sharpness Is Not Optional
Everything in this guide assumes your pruner is sharp. A dull blade does not make bad cuts because you are using bad technique; it makes bad cuts because physics. When the blade has to push and saw instead of slice, it compresses and tears the cell walls of the stem. That damage is visible as a crushed or fibrous-looking cut end instead of a smooth one, and the plant has to do a lot more work to callous over it. For a quick sharpness test, try slicing through a piece of newspaper: a sharp bypass blade will cut it cleanly, a dull one drags and tears. If it tears, sharpen before you touch a plant.
A simple diamond-coated pull-through sharpener or a small whetstone works fine on the VIVOSUN's stainless steel blade. You only sharpen the beveled side (the side that is not flat), and it takes about a dozen light strokes to bring the edge back. If sharpening sounds like too much, the VIVOSUN is inexpensive enough that replacing it once a season costs less than lunch out. Some gardeners keep two and rotate. I am not quite that organized, but I understand the impulse. For a deeper look at why sharpness matters at every stage of a season, the article on 10 reasons sharp pruning shears matter covers all of it in more detail than I have room for here.
If you are curious about how this shear holds up over the long haul, the VIVOSUN pruner long-term review tracks a full year of daily use across roses, ornamental shrubs, and herb pruning. The short version is that it holds up better than the price suggests, though the blade does benefit from occasional sharpening after a few months of regular work. It is not a forever tool in the way a Felco might be, but for most home gardeners it is exactly the right amount of tool.
Sharp shears, clean cuts, healthy shrubs. That is the whole equation.
The VIVOSUN 6.5" bypass pruner is the tool this guide is built around. Over 64,000 Amazon buyers use it for exactly what we described here: clean, controlled cuts on roses, ornamentals, and general shrub work. It comes sharp, the spring return is comfortable, and the price makes it an easy decision.
Amazon Check Today's Price on Amazon →